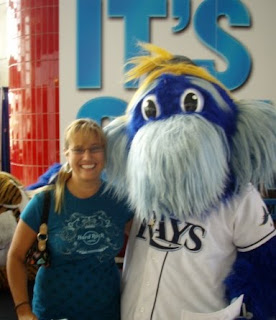
 This past weekend my husband took me to the Mascot Games in Orlando. I LOVE characters, as I'm sure I've mentioned, so this was so much fun for me! I got their autographs and pics. Some of them were so funny! There were about 35 or so different mascots and they are grouped into 4 teams and compete against each other in timed games, like joust and racing, and an obstacle course. It was hysterical! We will definitely do that again. This is a pic of me with Ray from the Tampa Bay Rays.
Miles of Smiles,

 I made this card for a friend who had a housewarming party recently. I started with a mauve cardstock for the card base, and a background of plaid patterned paper that I embossed and inked. The house is cut from fushia cardstock that I embossed, blue patterned paper for the roof, cream behind the windows, mauve embossed for the chimney. Blue and cream paper flowers with teeny-beeny rhinestones. "happy" is a rubber stamp and "Home" is a rub-on. I crossed some fushia ribbon, poked a pretty brad through and attached to the corner, kind of like a makeshift sunshine.
Miles of Smiles,
 I made this card for a woman at work who celebrated 22 years employed at the College. I used navy blue cardstock, cream cardstock, blue patterned paper, yellow and cream paper flowers with yellow rhinestones, and sheer cream ribbon. I cut out the sentiment on my Cricut.
Miles of Smiles,
 My latest design for the BBTB2. I used a striped cardstock for the card, and cut out the dinosaur from plaid paper, Ready 2 Rock from charcoal and black cardstock, and the guitar/ukelele from brown cardstock. I then traced the 2 onto the same cardstock as the base card and elevated it with foam dots. I drew the features on the dinosaur. I cut a border for the bottom of the card and layered flowers with rhinestones on the top and bottom. This guy cracks me up with his little guitar! Go see the other awesome designs at BBTB2! Thanks for stopping by!
Miles of Smiles,
Ok people....are you ready for it?.... I found out for sure today that Hobby Lobby is coming to Daytona! Can you hear me hootin' from here? Whoot-whoot!!! Yay, hooray, and finally! I LOVE those stores, they have the coolest stuff, and so much more selection than soMe other stores....if you know what I mean. Now that I'm working in Daytona I can go there whenever I want....I just better learn to pace myself, haha.
Miles of Smiles,
 Here is my latest project for BBTB2. Our sponsor this week was Peggy Loves Vintage, so I chose the Hula girl and put her on a tag. I added the tag to a vintage image of a swimmer with some silk and paper flowers. I also added a strand of bling rhinestones to accentuate her curves and the flower in her hair. I then stamped "summer lovin" at the top and added a red ribbon to hang it. Go check the other girl's creations at BBTB2!
Miles of Smiles,
 Here I am at the Cheryl Crow concert at Universal Studios a few weeks ago. We had such a good time. We always bring along our roll-up blanket to sit on and listen to the concerts. This year we saw 3 Doors Down, Cheryl Crow, and Chicago. All the concerts were great but Cheryl sounded fabulous! There is a Mardi Gras parade before the concerts in which they throw beads to the crowd, so you can see my hub caught some for me. He's so tall, he doesn't have to put much effort into catching the beads. Watching him is entertainment enough! We had such great weather too, it was so nice to wear shorts on such mild evenings.
Miles of Smiles,
 Look at these adorable button jars that I found at Michael's dollar bin. They are so cute! The lid is a giant button and they even had the matcing ribbon hangers. I bought every color they had. They just need to get more colors. Love 'em!
Miles of Smiles,
 Wow! Kind of exciting! I am featured in a video with Megan at Above Rubies Studio! This is my first time in a video online. Eeeek! I am doing a tutorial of how I create rolled paper roses. We were at the Sunshine Crop last Saturday while Megan was visiting Florida and she saw me making the roses and asked if I'd do a video for it. It was a lot of fun, although I was a little nervous! Please go check out my video at Above Rubies Studio!
Miles of Smiles,
 Here are two little thank you cards I created recently. I used patterned cardstock for the base of the cards and punched holes in the top to add sheer ribbon. I added a torn vellum panel with clear stickers of very pretty painted flowers. I attached it to the card and Stickled the torn edge. I then added the "thanks" sticker, using a marker to color one green. I wanted these cards to be simple and not overdone, and similar but not exactly the same. One of my favorite effects is using Stickles over the torn edges of paper. Have a great weekend everybody!
Miles of Smiles,

 This past weekend my husband took me to the Mascot Games in Orlando. I LOVE characters, as I'm sure I've mentioned, so this was so much fun for me! I got their autographs and pics. Some of them were so funny! There were about 35 or so different mascots and they are grouped into 4 teams and compete against each other in timed games, like joust and racing, and an obstacle course. It was hysterical! We will definitely do that again. This is a pic of me with Ray from the Tampa Bay Rays.


