Happy first Monday of August! Hard to believe it's August. Where did the summer go? This week's challenge at Bitten By The Bug2 is to use a hot air balloon cut, or an airplane if you don't have the balloon. Hot air balloons are so popular right now. Although I do not have a cartridge that has a hot air balloon on it, I still wanted my project to feature it. So instead what I did was cut 6 flower petals from Flower Shoppe, used one as a base, folded the other 5 in half and glued them back to back to create a 3D hot air balloon. I cut out a square from coordinating paper, border punched one edge, and attached it with foam dots as the basket. I tied baker's twine through the basket and attached to the back of the hot air balloon. I added a strip of patterned paper that had parachuting frogs on it and even cut out a frog to sit in the basket. I adhered several puffy stickers including the dog in the basket, the bees and the swirls. The final touches were letter stickers to the basket and rhinestones to the corners. The hot air balloon is kind of elongated, and I considered trimming down the flower petals it's made from, but decided not to. I'm still not sure if that would look better or not. I really like the idea of the doggie and his froggie friend going on a trip in a hot air balloon. Isn't that silly? Go check out the other designer's creations at BBTB2! You'll be glad you did.

Miles of Smiles,
This layout is going up on the wall. I don't know why but I love this pic of me and the hubs. It's not even in focus. But I remember it clearly. We were on the tram to take us to the Magic Kingdom, but it was raining so we both got wet running to the tram, and then we were chilly riding on the tram cuz we were all wet. But here we are smiling away. Just another snapshot moment in the adventure of life!
Miles of Smiles,

Another scrapbook layout. Still in Savannah, at the Bonaventure Cemetery. I love this pic I snapped of the hubs as he turned around. I titled it Live which I guess is a little ironic since we are in a cemetery, but it was such a beautiful, serene place. In some ways seeing all the life that has passed through this place makes me appreciate the love and life that I have right now. That day was so clear and crisp, the air itself was invigorating. The wrought iron fence I cut out reminds me of some of the fences in the cemetery, and just the lovely wrought iron work laced all through Savannah.
Miles of Smiles,
Here's a scrapbook page I made recently. The photo is me and my hubs in Savannah, Georgia celebrating my birthday with dinner at the 17Hundred90 house. I chose the background paper with a chandelier for an important detail. Our cozy table was in the center of the tiny restaurant with a chandelier hanging over us. It was very romantic. After dinner we went on a ghost tour, which was a whole lot of fun! It was a little chilly, but not too bad for the middle of November. The whole weekend was just fantastic, and it made Savannah my new favorite city and weekend getaway.

Miles of Smiles,
It's Monday and that means another weekly challenge at BBTB2! This weeks challenge is to use a sunshine in our project. I chose the sunshine from Life's A Beach. I really liked the look of this sun cut. It was kind of classy looking. It reminded me of a piece of pottery artwork that would be hanging on the wall in somebody's house. I started the card with a teal 6x6 card base. I distressed the background paper and covered the card. I cut the sun and layer at 5" from mosaic patterned paper and orange cardstock. I used the negative from the layer cut to add a second level of rays behind the sun. I cut the sun in half and added it to the left side of the card. I Stickled the outline layer in copper. I cut a vellum phrase to fit the top of the card, and embellished the card with cork flowers, buttons and more copper Stickles.

Miles of Smiles,

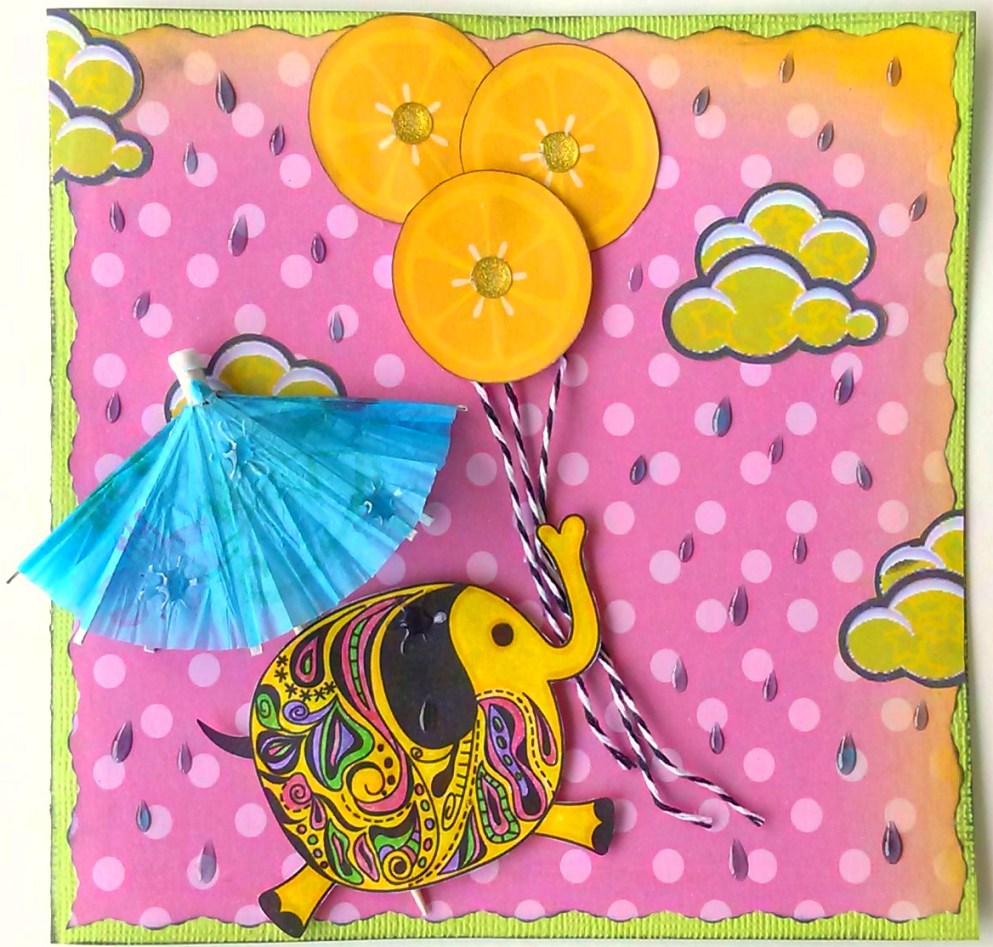
Hi! It's been raining a lot lately here in Florida, and I'm really missing the sunshine, so I think that might be why I chose to create this bright, cheery, whimsical elephant card! Notice, I added raindrops to it though. Can't get away from it! I created it using all Gecko Galz papers and digi image. Here's what I used:
 Gecko Galz Pink Lemonaid, Lemon Squeezy, and Star Burst papers; Gecko Galz Animal Crackers elephant digi image; lime cardstock; decorative trimmer blade; markers (Crayola); black ink (Martha Stewart); black/white baker's twine (We R Memory Keepers); water drop stickers (Fiskars); round glitter stickers (Stick-O); drink umbrella toothpick; foam dots (EK Success); cloud clip art (Microsoft)
 * Create a 6 x 6 card from lime cardstock. Trim Pink Lemonaid paper with decorative trimmer blade and ink the edges with black ink; adhere to card. Color elephant with markers and cut out; attach to card with foam dots. Cut out 3 lemons from the Lemon Squeezy paper to create balloons, attach twine to the back, and adhere to card with glue and foam dots. Adhere glitter stickers to the center of the lemon balloons. Thread twine behind the elephant's trunk. Print (or stamp) cloud image over Star Burst paper and cut out around cloud shape; adhere to card around other images. Fold a drink umbrella in half and slide toothpick behind the elephant to hold in place. Attach raindrop stickers to the background and splash stickers to the umbrella and elephant.
Miles of Smiles,
My friend and I have clear apothecary jars that we like to change out with seasonal decorations. It's always fun to try and design a new "vignette" to decorate the inside of the jar. Sometimes it's very simple, and other times, it's a little more involved. As this one is. Our theme was "beachy" and instead of just sand and shells I found some really cute items to add into the mix. I started with teenie-beenie blue rocks as the "water" element. I topped it with glittery white soft sand, letting some of the "water" show. I embellished with tiny shells, clear glass pebbles, a piece of driftwood, tin beach bail with shovel (which is really a candle holder), and adorable flip flops (which were key chains). I also added a paper drink umbrella, but I took the pic before I thought to add the umbrella. Cute, eh? Those tiny flip flops kill me! lol
Miles of Smiles,
Here's a little card I made for a friend's birthday. I started with a blue card base, topped with a brown polka dot paper. I added a patterned yellow cardstock that I distressed the edges, inked them, and curled the corners. I added a brown Thickers frame to the center with a butterfly epoxy sticker in the middle. I cut one piece of a rosette from the Cricut and used it as a fan, tied with baker's twine. I embellished with Candi dots, foil butterfly confetti bent up for dimension, and paper and felt flowers. I finished it by drawing brown stitches.
Miles of smiles,
Here's another fussy layout for the Gecko Galz design team of me staring dreamily at the Eiffel Tower. The thing is, I am not looking at the real Eiffel Tower. I am looking at a large painting at Disney World. My hub snapped the photo and I thought it looked really cool. That's the closest I've been to the real thing, lol! It's a really lovely piece of art. I created the layout using Gecko Galz Paris Flea Market digital image and Gecko Galz Parisian Jewels collage images; green patterned paper (Prima); newsprint patterned paper (Making Memories); blue patterned paper (K & Company); brown cardstock; paper flowers (Prima); printed buttons (Making Memories); 3D word sticker (K & Company); baker's twine; pearl stickers (Martha Stewart); ink pads (Martha Stewart); gel pens; sheer elastic ribbon (Hobby Lobby); pearl brad (Oriental Trading); border punch (Martha Stewart); mini stickers (Studio 112); foam dots; distressing tool; stapler; twigs with flowers (Hobby Lobby); clothing tag.
*Trim down newsprint patterned paper, ink the edges in pink, and distress the edges. Attach to the green patterned paper background. Color the digital image with various inks and gel pens; attach over the newsprint paper. Border punch brown strips and attach to the back of the photo and layer with a clothing tag and rectangle of blue patterned paper. Attach to the layout. Attach the Parisian Jewel images to brown cardstock; punch holes in the tops of 5 of the images; string baker's twine through and attach to layout with foam dots. Attach a Jewel image to the photo with foam dots. Staple the sheer elastic ribbon to the edge of the newsprint paper. Tie the twigs together with baker's twine and attach to the layout with a pearl brad. Affix the 3D word sticker to the photo. Fill in with printed buttons, stickers, and pink paper flowers topped with tiny pearl centers.
This is a fun and girly layout and gives me hope of one day flying off to Paris to see the Eiffel Tower in person. :)
Miles of Smiles,
I created this fussy layout for the Gecko Galz design team. More photos to scrap from Bonaventure Cemetary in Savannah (my new favorite city)! I used Gecko Galz TooTweet digital image Birds on Wreath, and Gecko Galz Tickets Please collage sheet2; burgundy cardstock; green patterned paper, red patterned paper and rose patterned paper (K & Company); polka dot patterned paper (DCWV); border punch (Martha Stewart); chipboard birds (Reminisce); Cricut & Ribbons and Rosettes cartridge (Provo Craft); silver brads; fabric brad; assorted mini stickers (Studio 112 and Sticko) and gems; colored pencils; brown ink (Sugarloaf Products); distressing tool; foam dots; silk flowers.
*Distress two edges of the green patterned paper and border punch the other two edges. Attach to burgundy background cardstock. Color digital image with colored pencils and cut out. Create rosettes on the Cricut using the rose and red patterned papers. Cut out three polka dot scalloped circles and ink. Ink the edges of the chipboard birds. Arrange and layer photos and other images on the green patterned paper. Attach the wreath image and ticket stub images with foam dots. Attach the silk flowers with silver brads and the larger flower with a fabric brad. Attach the rosettes and top with green flower gems. Fill in with various gems and stickers.
I am really enjoying this fussy style of scrapbooking. It lets me add a lot of detail and interesting elements to a page.
Miles of Smiles,
Happy Monday! Are you ready for this week's Bitten By the Bug2 Challenge? This week's challenge is to create any project with a kitchen item on it. Now, admittedly, I don't own any cartridges associated with cooking or the kitchen as I am, as I like to say "kitchenly" challenged. But thankfully the Joys of the Season cartridge has an adorable tea cup on it. I started with a red card base and covered it with a linen patterned paper. I cut the teacups from a teenie-beenie floral print with a red shadow. I blinged up the cups with some rhinestones, butterfly clips, twine, and vintage brads. I added paper ribbon across the top, letter stickers, rhinestone swirls, and paper flowers. I think it's a fairly simple design but cute too. Go check out the other designs at BBTB2 and link up to share your project with us! Have a great week!
Miles of Smiles,
Check out my new ride! This is my very first brand new car! I am so excited! It is a Hyundai Sonata 2.0T. I never thought I would own a new car. It's kind of a big deal to me. My old car, a Honda CRV, had like 180,000 miles on it. It still ran, but not very good lately. And since I am a commuter, it's pretty much a necessity to have a reliable vehicle, and a safe one. This has all the bells and whistles: nav, back-up camera, sporty wheels, turbocharged, panoramic sun roof, black leather interior, bluetooth, XM, ipod connect, heated seats, fog lights. {sigh} I just love it. It's got some get up and go too, which is always nice when yielding into I-4 traffic. Now I just have to figure out how it all works. LOL
Miles of Smiles,
 Happy Monday! I am the host of the Bitten By The Bug2 Challenge this week. The challenge is to use a frame from any cartridge. I really want to see it used on a scrapbook layout, but some people are not scrapbookers, so use the frame on any project. Here, I've created a layout using a frame from the Fancy Frames cartridge. Sorry, it's not a very good pic. My laptop monitor died and I hooked it up to another (ancient) monitor, and honestly, I have no idea what this pic will look like uploaded. I started with a patterned green cardstock with letters on it. How fortuitious that the letter B was in the left corner! B for Ben, my sweet hub. His photo looks much better than in this pic too. I abused various papers, layered them, inked them, punched them, and stamped stitches all over. I added black felt swirls, buttons, flowers, rhinestones, teenie-beenie stickers, and pom-poms for flower centers. I highlighted the B by rubbing black ink around it. And I spelled out the rest of his name with sticky letters. This is another "fussy" layout, which is a style I have been experimenting with. Go check out the other designer's projects at BBTB2! And play along with us too by uploading your take on the challenge!
Miles of Smiles,


 Happy first Monday of August! Hard to believe it's August. Where did the summer go? This week's challenge at Bitten By The Bug2 is to use a hot air balloon cut, or an airplane if you don't have the balloon. Hot air balloons are so popular right now. Although I do not have a cartridge that has a hot air balloon on it, I still wanted my project to feature it. So instead what I did was cut 6 flower petals from Flower Shoppe, used one as a base, folded the other 5 in half and glued them back to back to create a 3D hot air balloon. I cut out a square from coordinating paper, border punched one edge, and attached it with foam dots as the basket. I tied baker's twine through the basket and attached to the back of the hot air balloon. I added a strip of patterned paper that had parachuting frogs on it and even cut out a frog to sit in the basket. I adhered several puffy stickers including the dog in the basket, the bees and the swirls. The final touches were letter stickers to the basket and rhinestones to the corners. The hot air balloon is kind of elongated, and I considered trimming down the flower petals it's made from, but decided not to. I'm still not sure if that would look better or not. I really like the idea of the doggie and his froggie friend going on a trip in a hot air balloon. Isn't that silly? Go check out the other designer's creations at BBTB2! You'll be glad you did.