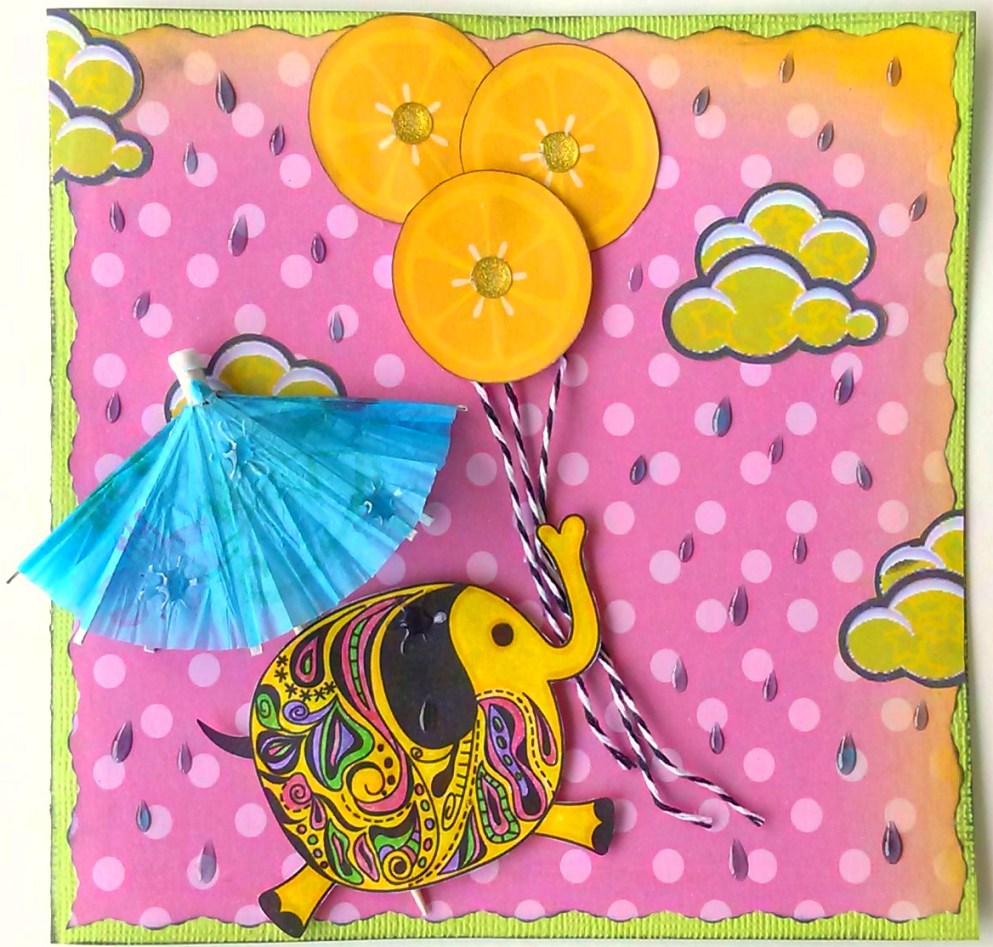
Hi! It's been raining a lot lately here in Florida, and I'm really missing the sunshine, so I think that might be why I chose to create this bright, cheery, whimsical elephant card! Notice, I added raindrops to it though. Can't get away from it! I created it using all Gecko Galz papers and digi image. Here's what I used:
 Gecko Galz Pink Lemonaid, Lemon Squeezy, and Star Burst papers; Gecko Galz Animal Crackers elephant digi image; lime cardstock; decorative trimmer blade; markers (Crayola); black ink (Martha Stewart); black/white baker's twine (We R Memory Keepers); water drop stickers (Fiskars); round glitter stickers (Stick-O); drink umbrella toothpick; foam dots (EK Success); cloud clip art (Microsoft)
 * Create a 6 x 6 card from lime cardstock. Trim Pink Lemonaid paper with decorative trimmer blade and ink the edges with black ink; adhere to card. Color elephant with markers and cut out; attach to card with foam dots. Cut out 3 lemons from the Lemon Squeezy paper to create balloons, attach twine to the back, and adhere to card with glue and foam dots. Adhere glitter stickers to the center of the lemon balloons. Thread twine behind the elephant's trunk. Print (or stamp) cloud image over Star Burst paper and cut out around cloud shape; adhere to card around other images. Fold a drink umbrella in half and slide toothpick behind the elephant to hold in place. Attach raindrop stickers to the background and splash stickers to the umbrella and elephant.
Miles of Smiles,
My friend and I have clear apothecary jars that we like to change out with seasonal decorations. It's always fun to try and design a new "vignette" to decorate the inside of the jar. Sometimes it's very simple, and other times, it's a little more involved. As this one is. Our theme was "beachy" and instead of just sand and shells I found some really cute items to add into the mix. I started with teenie-beenie blue rocks as the "water" element. I topped it with glittery white soft sand, letting some of the "water" show. I embellished with tiny shells, clear glass pebbles, a piece of driftwood, tin beach bail with shovel (which is really a candle holder), and adorable flip flops (which were key chains). I also added a paper drink umbrella, but I took the pic before I thought to add the umbrella. Cute, eh? Those tiny flip flops kill me! lol
Miles of Smiles,
Here's a little card I made for a friend's birthday. I started with a blue card base, topped with a brown polka dot paper. I added a patterned yellow cardstock that I distressed the edges, inked them, and curled the corners. I added a brown Thickers frame to the center with a butterfly epoxy sticker in the middle. I cut one piece of a rosette from the Cricut and used it as a fan, tied with baker's twine. I embellished with Candi dots, foil butterfly confetti bent up for dimension, and paper and felt flowers. I finished it by drawing brown stitches.
Miles of smiles,
Here's another fussy layout for the Gecko Galz design team of me staring dreamily at the Eiffel Tower. The thing is, I am not looking at the real Eiffel Tower. I am looking at a large painting at Disney World. My hub snapped the photo and I thought it looked really cool. That's the closest I've been to the real thing, lol! It's a really lovely piece of art. I created the layout using Gecko Galz Paris Flea Market digital image and Gecko Galz Parisian Jewels collage images; green patterned paper (Prima); newsprint patterned paper (Making Memories); blue patterned paper (K & Company); brown cardstock; paper flowers (Prima); printed buttons (Making Memories); 3D word sticker (K & Company); baker's twine; pearl stickers (Martha Stewart); ink pads (Martha Stewart); gel pens; sheer elastic ribbon (Hobby Lobby); pearl brad (Oriental Trading); border punch (Martha Stewart); mini stickers (Studio 112); foam dots; distressing tool; stapler; twigs with flowers (Hobby Lobby); clothing tag.
*Trim down newsprint patterned paper, ink the edges in pink, and distress the edges. Attach to the green patterned paper background. Color the digital image with various inks and gel pens; attach over the newsprint paper. Border punch brown strips and attach to the back of the photo and layer with a clothing tag and rectangle of blue patterned paper. Attach to the layout. Attach the Parisian Jewel images to brown cardstock; punch holes in the tops of 5 of the images; string baker's twine through and attach to layout with foam dots. Attach a Jewel image to the photo with foam dots. Staple the sheer elastic ribbon to the edge of the newsprint paper. Tie the twigs together with baker's twine and attach to the layout with a pearl brad. Affix the 3D word sticker to the photo. Fill in with printed buttons, stickers, and pink paper flowers topped with tiny pearl centers.
This is a fun and girly layout and gives me hope of one day flying off to Paris to see the Eiffel Tower in person. :)
Miles of Smiles,
I created this fussy layout for the Gecko Galz design team. More photos to scrap from Bonaventure Cemetary in Savannah (my new favorite city)! I used Gecko Galz TooTweet digital image Birds on Wreath, and Gecko Galz Tickets Please collage sheet2; burgundy cardstock; green patterned paper, red patterned paper and rose patterned paper (K & Company); polka dot patterned paper (DCWV); border punch (Martha Stewart); chipboard birds (Reminisce); Cricut & Ribbons and Rosettes cartridge (Provo Craft); silver brads; fabric brad; assorted mini stickers (Studio 112 and Sticko) and gems; colored pencils; brown ink (Sugarloaf Products); distressing tool; foam dots; silk flowers.
*Distress two edges of the green patterned paper and border punch the other two edges. Attach to burgundy background cardstock. Color digital image with colored pencils and cut out. Create rosettes on the Cricut using the rose and red patterned papers. Cut out three polka dot scalloped circles and ink. Ink the edges of the chipboard birds. Arrange and layer photos and other images on the green patterned paper. Attach the wreath image and ticket stub images with foam dots. Attach the silk flowers with silver brads and the larger flower with a fabric brad. Attach the rosettes and top with green flower gems. Fill in with various gems and stickers.
I am really enjoying this fussy style of scrapbooking. It lets me add a lot of detail and interesting elements to a page.
Miles of Smiles,

 Gecko Galz Pink Lemonaid, Lemon Squeezy, and Star Burst papers; Gecko Galz Animal Crackers elephant digi image; lime cardstock; decorative trimmer blade; markers (Crayola); black ink (Martha Stewart); black/white baker's twine (We R Memory Keepers); water drop stickers (Fiskars); round glitter stickers (Stick-O); drink umbrella toothpick; foam dots (EK Success); cloud clip art (Microsoft)
 * Create a 6 x 6 card from lime cardstock. Trim Pink Lemonaid paper with decorative trimmer blade and ink the edges with black ink; adhere to card. Color elephant with markers and cut out; attach to card with foam dots. Cut out 3 lemons from the Lemon Squeezy paper to create balloons, attach twine to the back, and adhere to card with glue and foam dots. Adhere glitter stickers to the center of the lemon balloons. Thread twine behind the elephant's trunk. Print (or stamp) cloud image over Star Burst paper and cut out around cloud shape; adhere to card around other images. Fold a drink umbrella in half and slide toothpick behind the elephant to hold in place. Attach raindrop stickers to the background and splash stickers to the umbrella and elephant.


