November 21, 2011

Naughty But Mice

Happy Monday before Thanksgiving! Who's ready for Turkey Day dinner? I am!!  I'm the host of the Bitten By The Bug2 challenge this week and I chose the mouse from the Meow cartridge, or a mouse cut from any cartridge. I've been seeing lots of mice themed Christmas decorations lately, so I decided to make one for myself. I started with a wintery blue scrapbook paper with foil embossed ornaments. I cut the mice at 6" and swirl embossed the pale blue snowflake papers (each mouse is cut from a different patterned paper) and the pink cardstock ears. I created a "lady and gentleman" mouse with accessories. Mr. Mouse got a top hat, bowtie, eyebrow, and mitten. Mrs. Mouse got a matching scarf and hair bow, eyelashes, blush, and mitten. I cut banners out of watermelon cardstock. I attached a mouse to each end of the background paper with foam dots, and spelled out "Naughty but Mice" with Thickers, letter stickers, and glittered chipboard letters. I punched several snowflakes from the watermelon cardstock and the pale blue snowflake patterned papers and attached them with foam dots with a sparkly sticker in the center. I like the non-traditional Christmas colors in this project and all the dimension and texture. Check out the other designers' creations at BBTB2 and see all the lovely designs! 


Miles of Smiles,


November 20, 2011

Gift Box

I created a small gift box from the Tags, Bags, Boxes & More cartridge, Gecko Galz Winter Wonderland collage sheet2, and colorful patterned paper. Ink all edges green. Turn the gift bag on its side. Mat the collage image with green cardstock and adhere to the gift box. Squeeze clear drying glue to the bottom of the image and sprinkle with mica flake. When glue/mica is dry, adhere vintage die cuts and chipboard to the edges of the collage image. Attach snowflake confetti with foam dots and top each with a blue rhinestone. Punch a hole through the opening of the gift bag and thread a wide satin ribbon, double tying the ends for a full bow. 


Simple Things card

This was a fun card to make. I used Gecko Galz 12 Days collage sheet 2. Create card from newsprint cardstock and ink edges with red ink. Using a craft knife, cut around the glitter banner on the cardstock. Lightly ink the white space around the collage image with brown and red ink. Attach the image to the swirl paper, then to the colored block paper. Adhere to the left side of the card beneath the banner. Loop the bakers twine around your hand several times, knot one end, and cut the loops of the other end. Tie beads onto the twine, attach to the card with a decorative metal brad. Adhere strips of decorative tape to the corners of the image. Adhere the fabric sentiment sticker over the image. Attach an embossed felt flower to the card with a decorative metal brad.


Angel Flower Pot

This is a quick and easy project. I used Gecko Galz Angels collage sheet 1, ribbon, stick pins, ticket, black ink and a pink flower pot. Cut out the angel image and center on the flower pot, adhering all but the wings to the flower pot. Tie ribbon tightly around the flower pot, over the angel but under the wings. Ink the edges of the ticket stub with black ink. Pin the ticket stub to the ribbon bow with a flower stick pin. Add another flower stick pin to the bow. This would make a great gift by adding a small potted plant to the flower pot. 


October 31, 2011

We Three Ghosts

Hello!  How is everyone on this lovely Halloween? I just love this holiday! To celebrate the day, our challenge for this week at BBTB2 was to use one of the ghost cuts from the Paper Dolls cartridge. I created this "We Three Ghosts" banner. I cut the ghost on various white patterned papers, fit to page. I then cut out the eyes from brown cardstock. I backed the eyes with blue cardstock and the mouth with melon cardstock. I inked the edges with brown ink and outlined the ghosts with a brown Sharpie. I attached a Halloween bowtie to each one and spelled out "we three ghosts" with acrylic letters. I punched a hole in the hands and strung a green satin ribbon. This ghostie was so darn cute, I can imagine so many ways to embellish him! Go see the other designer's creations at BBTB2!  HAPPY HALLOWEEN!


Miles of Smiles, 


October 30, 2011

Vintage Hats

This is a card I made using a Gecko Galz digi image of vintage hats. I created a card base and covered it with vintage patterned paper. I colored the hats with markers and ink pads then mounted it to Gecko Galz Sonnet background paper. I cut strips of the script patterned paper and attached them to the card overlapping the digi image. I also added the script to the top of the card and vertically to left side of the card. I created rosettes from small paper flowers and attached them to the card. I Stickled the rose in the patterned paper and the flowers on the hats.


Miles of Smiles,


Sing

Sing...sing a song...make it simple...to last your whole life long. Don't worry that it's not good enough for anyone else to hear....sing...sing a song. Here is another Gecko Galz project using the frog image and the sheet music background paper. I added the images to a dark green cardstock base, and added adhesive letters to spell "sing".  I topped it off with flower and leaf beads, with red Stickles centers.


Miles of Smiles, 


Fashionista

Here's a Gecko Galz design team creation I recently made and am now finally getting around to posting.  I started with a black card base and added a strip of pink chandelier paper to the bottom. I fanned out the 3 Gecko Galz collage images and pop dotted the top image. I added black and white ribbon below the images and created a rosette from the same ribbon, stapling it to the card. Finally I topped it off with a strip of rhinestones.  Gotta have some bling on a fashionista card!


Miles of Smiles,


September 26, 2011

Wheelbarrow Challenge


Hi! Is everyone catching the fall spirit like me? All I want to do is create Halloween and fall projects, even though it's still really HOT here in Florida. No worries! I am slowly putting out the Halloween decorations at our house. Fun Fun Fun! I will be so ready for my Halloween party with the girls! This week's 
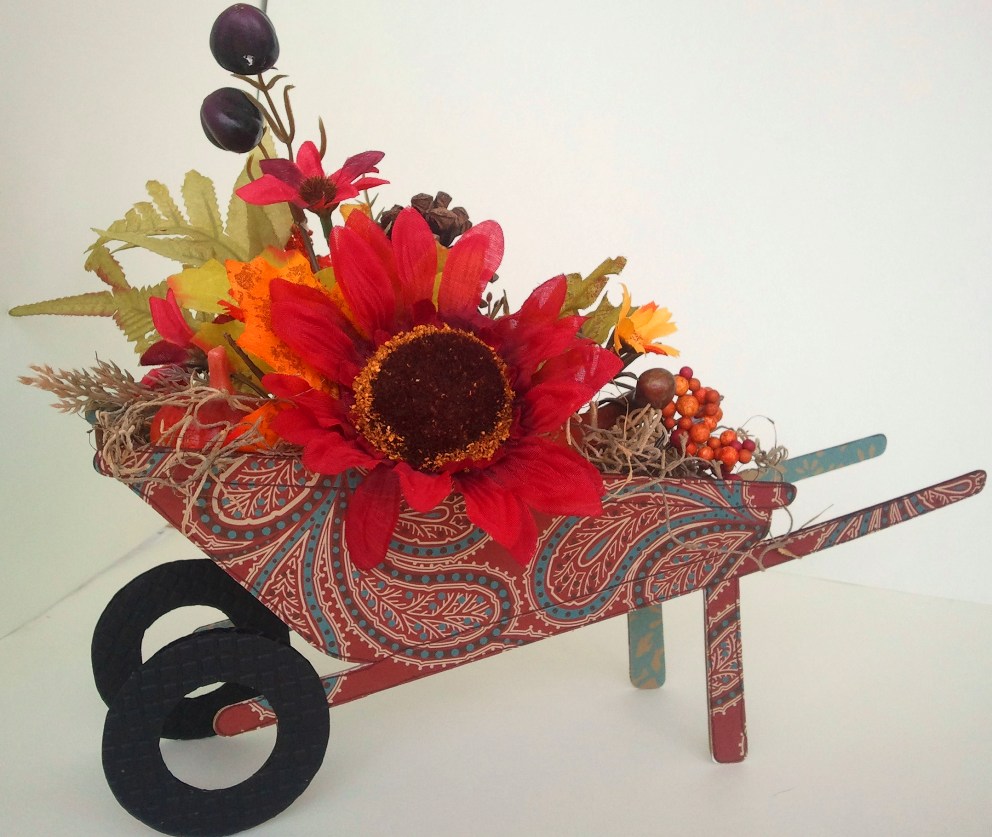
BBTB2 Challenge was to use the wheelbarrow from Walk In My Garden. Of course I used fall colors to fit my current theme! I first cut the wheelbarrow from chipboard. I then cut two images from cranberry paisley paper and two from blue patterned paper. Don't forget to flip the image for each of the papers you cut. I covered the outside of the wheelbarrow with the paisley cardstock and the inside with the blue cardstock. I traced the wheel four times onto black cardstock and cut out for the inside and outside of each wheel. Emboss the wheels. Outline the image with a brown marker. I cut a strip of brown cardstock to fit between the two wheelbarrow images. Make small snips with scissors along the long edges of the brown strip to create tabs to glue to the inside of the wheelbarrow. Voila! Now fill it! I chose some dried moss and a fall pick. Go see the other fabulous designers' projects at BBTB2! Have a wonderful week!

Miles of Smiles,


September 12, 2011

Coffin Box

This week's Bitten By The Bug2 Challenge was to use a 3D treat box. I used the coffin box from Happy Hauntings. Although I do not own this cartridge, I borrowed from my fab friend Daphne recently to make some Halloween decorations for my home. I cut the lid and base of the box from black cardstock, then misted it with Perfect Pearls red mist. I thought it kinda looked like blood splatter (eek!) I made an easy peasy crepe paper rose and stuck it on the lid of the box. I then created rosette flowers from small paper flowers and adhered them to the bottom of the lid. I added letter stickers and a 3D vampire sticker, and red rhinestones to the corners. I colored foil butterfly confetti with a Sharpie, bent up their wings and glued them onto the lid too. Finally I added some red Smooch paint for bigger blood drops. I don't know why I chose butterflies instead of bats or spiders. I just had it in my head that I wanted to used black butterflies. I covered the interior of the box with red crepe paper ruffles. It's all ready to add yummy Halloween candy...maybe Red Hots..... Hope you like! Check out the other creations at BBTB2! Fun!!

Miles of Smiles,


September 8, 2011

Boo!

As I said, I can't wait for Halloween! In the spirit of the season, I created this frame for our house. I found the black frame at a dollar store (I know! Riiight?!) I added scraps of Halloween paper behind the glass. I cut the letters from the Cricut (Winter Woodland) and attached them to the top of the glass with foam dots. Then I added Halloween stickers from the dollar section at Joann's. Pretty cute, huh? And it cost less than $4!!  Can't beat that for a one-of-a-kind home decor piece!

Miles of Smiles,