September 26, 2011

Wheelbarrow Challenge


Hi! Is everyone catching the fall spirit like me? All I want to do is create Halloween and fall projects, even though it's still really HOT here in Florida. No worries! I am slowly putting out the Halloween decorations at our house. Fun Fun Fun! I will be so ready for my Halloween party with the girls! This week's BBTB2 Challenge was to use the wheelbarrow from Walk In My Garden. Of course I used fall colors to fit my current theme! I first cut the wheelbarrow from chipboard. I then cut two images from cranberry paisley paper and two from blue patterned paper. Don't forget to flip the image for each of the papers you cut. I covered the outside of the wheelbarrow with the paisley cardstock and the inside with the blue cardstock. I traced the wheel four times onto black cardstock and cut out for the inside and outside of each wheel. Emboss the wheels. Outline the image with a brown marker. I cut a strip of brown cardstock to fit between the two wheelbarrow images. Make small snips with scissors along the long edges of the brown strip to create tabs to glue to the inside of the wheelbarrow. Voila! Now fill it! I chose some dried moss and a fall pick. Go see the other fabulous designers' projects at BBTB2! Have a wonderful week!

Miles of Smiles,


September 12, 2011

Coffin Box

This week's Bitten By The Bug2 Challenge was to use a 3D treat box. I used the coffin box from Happy Hauntings. Although I do not own this cartridge, I borrowed from my fab friend Daphne recently to make some Halloween decorations for my home. I cut the lid and base of the box from black cardstock, then misted it with Perfect Pearls red mist. I thought it kinda looked like blood splatter (eek!) I made an easy peasy crepe paper rose and stuck it on the lid of the box. I then created rosette flowers from small paper flowers and adhered them to the bottom of the lid. I added letter stickers and a 3D vampire sticker, and red rhinestones to the corners. I colored foil butterfly confetti with a Sharpie, bent up their wings and glued them onto the lid too. Finally I added some red Smooch paint for bigger blood drops. I don't know why I chose butterflies instead of bats or spiders. I just had it in my head that I wanted to used black butterflies. I covered the interior of the box with red crepe paper ruffles. It's all ready to add yummy Halloween candy...maybe Red Hots..... Hope you like! Check out the other creations at BBTB2! Fun!!

Miles of Smiles,


September 8, 2011

Boo!

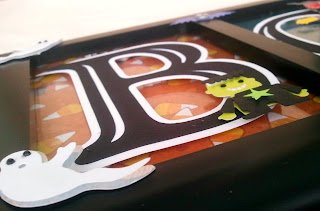
As I said, I can't wait for Halloween! In the spirit of the season, I created this frame for our house. I found the black frame at a dollar store (I know! Riiight?!) I added scraps of Halloween paper behind the glass. I cut the letters from the Cricut (Winter Woodland) and attached them to the top of the glass with foam dots. Then I added Halloween stickers from the dollar section at Joann's. Pretty cute, huh? And it cost less than $4!!  Can't beat that for a one-of-a-kind home decor piece!

Miles of Smiles,

September 6, 2011

Not-So-Bad Witch Wallhanging

OK, I don't mean to seem big headed, but I LOVE how this project turned out! I started with a black cardstock base, topped with a purple border punched cardstock. I matted the green Gecko Galz background paper to orange cardstock and attached it to the purple cardstock. I added the Gecko Galz witch image, ravens and "witch" wording with foam dots. I printed the rest of the text boxes, cut them out and attached them to complete the phrase. I created easy peasy crepe paper roses and attached them to the corners, highlighted with black Stickles. I added orange half-folded cupcake liners to the back to frame the project. I outlined the background paper and text boxes with black Stickles, and embellished "witch" with diamond Stickles.  The phrase just popped into my head and I thought the naughty witch image totally complimented it. This project will be added to my stash of Halloween decorations, definitely!

Miles of Smiles,

Creepy Menu

I have been in a "falloween" mood lately. I can't wait to start decorating for Halloween and the fall holidays. I did a little fall decorating today, but I am waiting just a couple more weeks until I engulf the house in Halloween! I am having a Halloween party for the girls (my crafty sisters) and I want to go all out this year! This little project will be on display.  It is a creepy menu I created with a Gecko Galz image.  All I did was type the menu items onto the vintage image in white, print and cut it out. I then matted the menu with orange cardstock trimmed to fit the image, added green star brads, green and purple curling ribbon, outlined the chalkboard with black Stickles and "blood splatters" with red Stickles. I also created a "kickstand" for the back so the menu stands upright.

Miles of Smiles,

Kick Up Your Heels, Girls!

Another Gecko Galz design, this card was fun and easy to create. I started with a watermelon cardstock for the base of the card. I backed the Gecko Galz dancing girls image to teal cardstock, matted with gold cardstock attached to the card front. I cut out the Gecko Galz Hello Dolly legs images and attached them over the legs of the dancing girls. I then printed out the sentiment, cut it out, crinkled it, chalked it and attached it to the image. I enhanced the ladies' lips with red Smooch. Lastly, I layered a felt flower with paper flowers and a large rhinestone attached to the top corner of the card.  This is a fun a quirky card and I really like how the colors came together.

Miles of Smiles,

Butterfly Lady

The image on this card is from Gecko Galz. And what a lovely image it is! I created a card base from teal cardstock, added a teal flower print background paper, punched at the corners. I placed the vintage image onto a vintage chipboard image. I then backed the chipboard with pink patterned paper and teal cardstock and a half-folded cupcake liner, then attached it to the card with foam dots. I created cupcake liner rosettes and attached them to the bottom corner of the card. (See my QuickClip video on how to make these easy peasy paper rosettes.) I added an acetate butterfly and bent the wings up. Finally I embellished the punched corners with teal rhinestones and gold Stickles, and highlighted the images flowers and necklace with gold Stickles. Oo La La!

Miles of Smiles,


Namaste'

Here is a project I created for the Gecko Galz design team.  The image and background paper is Gecko Galz. I added acetate butterflies and bent their wings up for dimension.  I also added a few vintage K&Company pieces pop dotted with foam dots, letter stickers, and Stickles to highlight parts of the image.  Namaste' my friends!

Miles of Smiles,